
Orca Cloud Help Guide 
Orca Cloud is a centralized cloud platform for keeping your 3D printing profiles in sync and sharing selected profiles, bundles, and plugins with the community.
This guide walks new OrcaSlicer users through signing in to Orca Cloud, managing synced profiles, creating and managing Shared Bundles, browsing community bundles in Explore, subscribing to bundles, using Plugins to share or discover OrcaSlicer extensions, and updating account settings.
What is Orca Cloud? 
Orca Cloud keeps your OrcaSlicer profiles synchronized and gives you explicit ways to share profile bundles and plugins with other users. Shared Bundles can include printer, filament, and process profiles, while Plugins give creators a place to publish script or wheel-based extensions with descriptions, compatibility details, screenshots, and update history.
Before You Begin 
Before using Orca Cloud, make sure the following are ready:
Use a supported OrcaSlicer build: Orca Cloud is available starting with the OrcaSlicer
2.4.0release.Disable Stealth mode: Orca Cloud is not available while OrcaSlicer is in Stealth mode. Disable Stealth mode so the Orca Cloud login panel appears in Home View.
Connect to the internet: Orca Cloud requires an active internet connection to sign in, sync profiles, browse Explore, and share bundles.
Sign in or create an account: You need an Orca Cloud account before profiles, bundles, and subscriptions can sync across devices.
Prepare your local profiles: Printer, filament, and process profiles sync from OrcaSlicer after you sign in. If you want specific profiles to appear in Orca Cloud, create or import them in OrcaSlicer first.
Refresh sync when needed: If recent changes do not appear immediately, restart OrcaSlicer or use Sync Presets from the system file menu.

Orca Cloud Setup 
Start in OrcaSlicer, then sign in or create an Orca Cloud account.
Launch OrcaSlicer.

OrcaSlicer launch screen Click Login / Register.

Login and Register entry point in OrcaSlicer Register by creating a new account, then click Create account.

Orca Cloud account registration form You can also sign up with one of the available third-party options: Google, Apple, or GitHub.

Google, Apple, and GitHub sign-up options After signing in, open Orca Cloud from cloud.orcaslicer.com or by clicking the Orca Cloud menu button in OrcaSlicer.

Orca Cloud menu button in OrcaSlicer The Orca Cloud interface opens in your browser.

Orca Cloud opened in a browser
Profiles 
Profiles let you view and manage the printer, filament, and process profiles that sync automatically from OrcaSlicer after you log in to Orca Cloud. This keeps profile data available across different machines or OrcaSlicer instances without manually moving configuration files.
Navigate Profiles 
Use the Profiles page to inspect synced presets and review profile metadata.
Open the Profiles tab in the left side of the Orca Cloud web interface.

Profiles tab in the Orca Cloud navigation The Profiles interface shows all synced profiles in the left panel and the selected profile metadata in the right panel.

Profiles interface with profile list and metadata pane Each profile row shows the profile name, profile type, and last updated date and time.

Profile row showing name, type, and last updated time Search for a specific profile, or filter the list by Printer, Filament, or Process.

Profile search and filter controls Click the profile you want to review. In this example, only process profiles are shown because the Process filter is selected.

Filtered process profile list Use the options at the bottom of the metadata pane as needed:
Copy raw JSON: Copies the JSON contents so you can paste them into a local text editor while preserving the structure.
History: Opens version history for the selected profile.
Manage Profile History 
The History option lets you review previous versions of a selected profile, compare a version against the current profile, and restore a selected version when needed. Restored changes sync back to OrcaSlicer after restarting OrcaSlicer or using Sync Presets from the system file menu.
Click History next to Copy raw JSON.

History button in the profile metadata pane The profile history interface opens.

Profile history interface Use the left timeline panel to select a file version. The right panel shows a side-by-side comparison between the selected version and the current version.
For easier tracking, click the Add Label icon to add a label and description to a version.

Add label control in the profile timeline Hover over a label in the timeline to view the description as a tooltip.

Profile version label tooltip Click Labeled Only to show only versions that have user-defined labels.

Labeled Only filter in the profile timeline
To update the current profile to a previous version, click Restore to selected in the top-right corner of the comparison panel.

Restore to selected button After restoring, Orca Cloud creates a new timestamp entry in the timeline and updates the current version to match the selected version.

Restored profile version shown in the history comparison

Deleting Profiles 
You can delete synced printer, filament, or process profiles directly from the Orca Cloud interface. Once you restart OrcaSlicer or click Sync Presets, the deleted profiles will no longer appear.
Open the Profiles tab.
At the bottom of the left profile panel, click Edit.
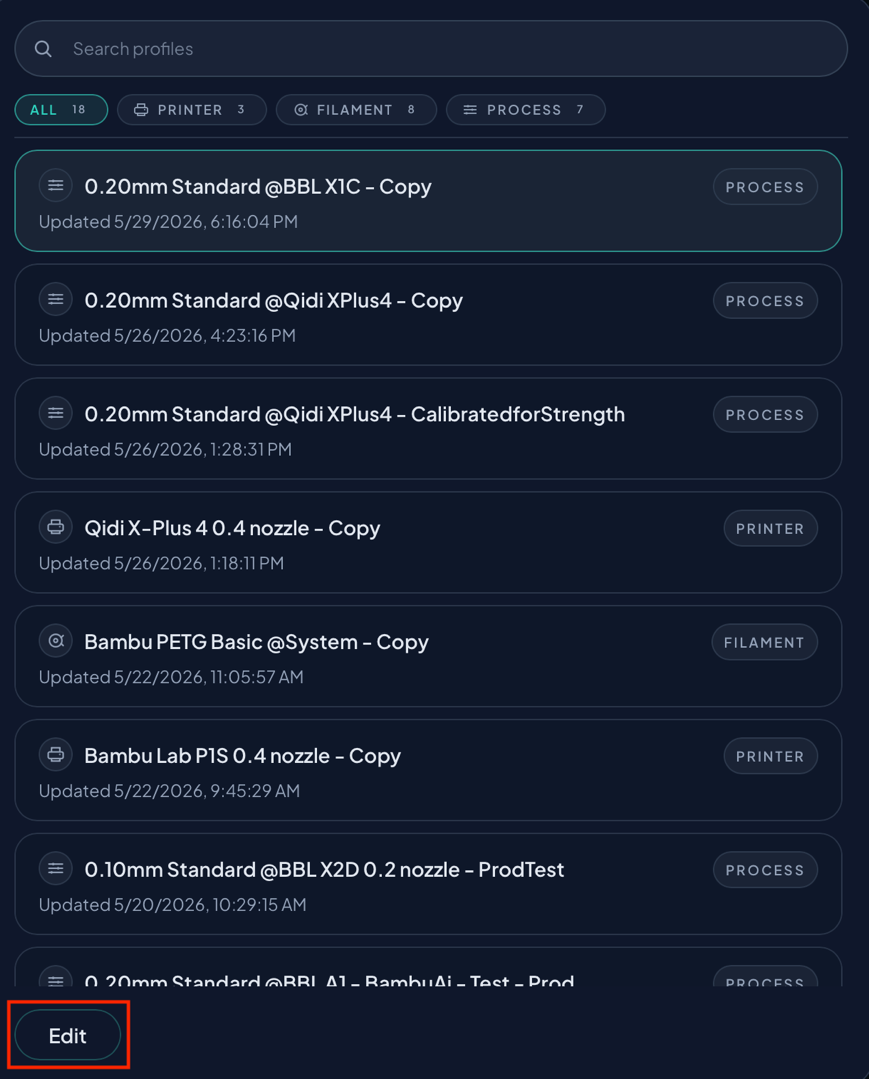
Edit button in the Profiles list Select the profiles you want to delete. You can select more than one profile at the same time.
Click Delete.
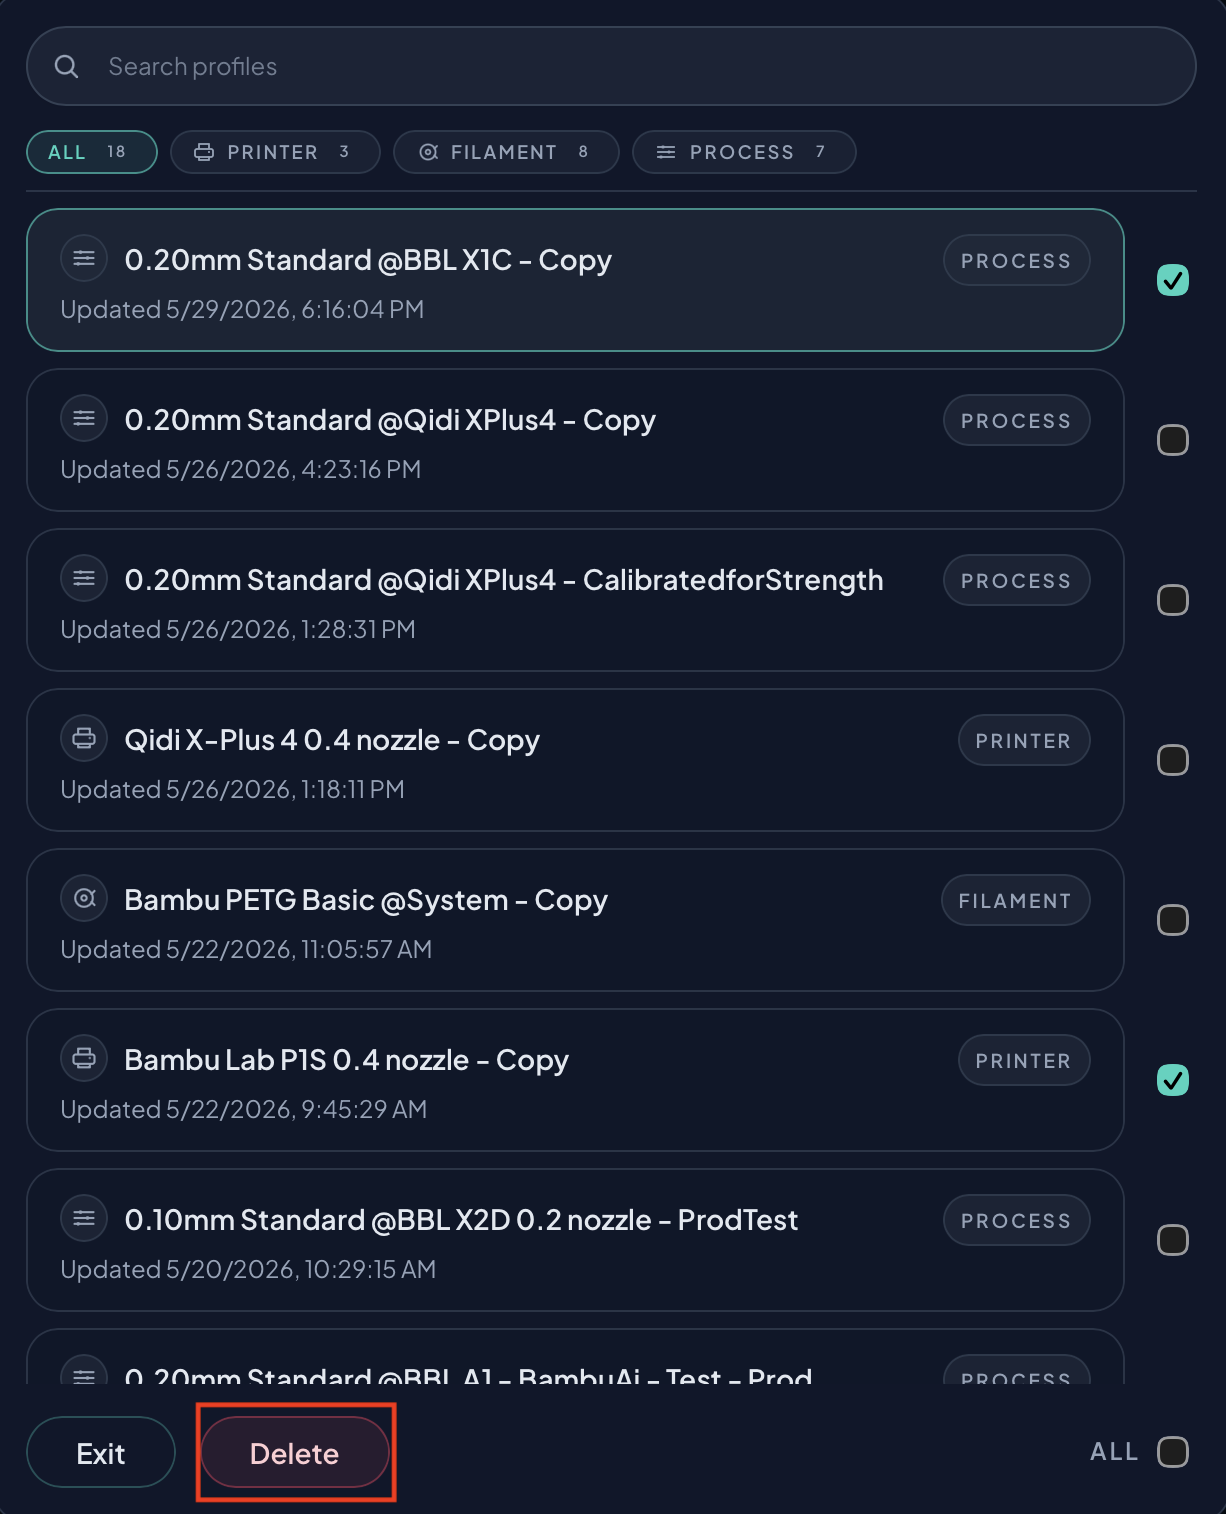
Selected profiles with the Delete action In the confirmation dialog, click Delete to remove the selected profiles.
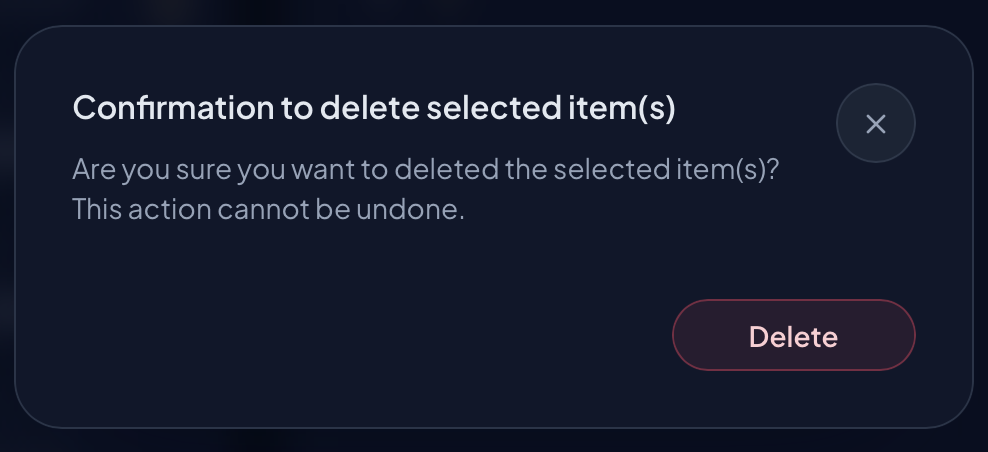
Delete profile confirmation dialog
Choose Bundle Visibility 
Before creating a bundle, decide whether it should be public or private.
Public Bundle: Appears in Explore and can be discovered by other Orca Cloud users. Anyone who can open the bundle page can subscribe.
Private Bundle: Does not appear publicly in Explore. Only users added to the private whitelist can open and subscribe to the bundle.
Shared Link: A shared link can be sent for either public or private bundles. For private bundles, the recipient must be added to the private whitelist before they can access the link.
Create a Shared Bundle 
Use the Bundles tab to select profiles, describe the bundle, and decide whether it should be public or private.
Open the Bundles tab in the left side of the Orca Cloud web interface.

Bundles tab in the Orca Cloud navigation Click the + icon at the bottom-right corner of the interface.

Add bundle button in Orca Cloud The Share profile bundle interface opens.

Share profile bundle interface In the left panel, review your synced profiles. Profiles are grouped by Printer, Filament, and Process.
Select the profiles you want to include. Use Show all or In your bundle to switch between all synced profiles and the profiles currently selected for this bundle.
Use the right panel to enter the bundle details:
Bundle Name: The public display name for the bundle.
Bundle Description: The main description for the bundle. You can include image and video links here.
Bundle Version (optional): A version label for the bundle.
Compatible Printers (optional): Search for compatible printers or use Generate compatible printers from selected profiles at the far-right end of the field.
Compatible OrcaSlicer Version (optional): Choose official OrcaSlicer release versions from the dropdown list.
Tags (optional): Add tags to make the bundle easier to discover in Explore.
Public / Private: Use the Public Bundle option to choose the visibility described in Choose Bundle Visibility. Enable it to make the bundle discoverable in Explore, or leave it unchecked to keep the bundle private and limited to whitelisted users.

Compatible printers field 
Generate compatible printers button Click Create to create the Shared Bundle.

Create shared bundle action After the bundle is created, Orca Cloud shows a sharing dialog with common social and messaging options. Anyone who opens the shared link will be taken to Orca Cloud and asked to subscribe to the bundle.

Share dialog after creating a bundle
Edit Your Shared Bundle 
Created bundles appear under the Shared Bundles tab. Open a bundle to update its name, profiles, description, sharing settings, or private access list.
Go to Shared Bundles in Orca Cloud and click the bundle you created.

Created bundle shown in Shared Bundles The bundle description appears with options to edit, share, delete, or manage the private whitelist.

Bundle detail page with edit, share, delete, and whitelist actions Click Edit bundle to open the edit interface.

Edit bundle interface Make the required changes, then click Save.
Manage Private Lists 
When a bundle is private, you can grant access to specific Orca Cloud users through the private whitelist.
Go to Shared Bundles in Orca Cloud and click the private bundle you created.
Click Manage private whitelist below the Edit Bundle option.

Manage private whitelist link The private bundle whitelist dialog opens. Add the usernames that should be allowed to access the private bundle.
Added users appear under Whitelisted Users. To revoke access, click Remove next to a username.

Private bundle whitelist dialog After users are added, Orca Cloud automatically sends them an email invitation to access the private bundle.

Private bundle email invitation The recipient can click Open Private Bundle from the invitation to access the bundle.

Share a Bundle 
The Share option opens a dialog with preset social media and messaging options. You can also copy the bundle link manually and send it through another platform.


Delete a Bundle 
Delete a bundle only when you are sure it is no longer needed. Deleting removes the bundle and cannot be undone.
Open the bundle and click Delete bundle below the Manage private whitelist option.

Delete bundle option Review the warning confirmation dialog. Confirming the delete action permanently removes the bundle.

Delete bundle confirmation dialog
Explore 
The Explore tab lets you browse bundles shared by the community. When you subscribe to a bundle, it syncs to OrcaSlicer the next time you log in or restart OrcaSlicer. If the bundle creator publishes an update, OrcaSlicer notifies subscribed users with a notification tip.

Discover Community Bundles 
Use the Explore page to find bundles by search, filters, and sorting options.

Search 
Search directly by bundle name, or describe what you are looking for in the search field.
Filter 
Use filters to narrow results by printer or tag. This helps you find bundles that match a specific printer, material, workflow, or requirement.


Active filters appear above the search bar. Remove a search keyword or filter chip to widen the results again.

Sort 
Sort Explore results by Most subscribed, Most likes, Recently Updated, or Alphabetical order.

Subscribe to a Bundle 
Subscribe to a community bundle when it matches your printing setup or workflow.
Click Explore.
Search for your desired requirement.
Review the displayed bundles and choose the one that best meets your needs.
Open the bundle.
Click Subscribe at the bottom-right corner of the web interface.

Subscribe and share controls on a community bundle
Subscribed Bundles 
The Subscribed Bundles tab displays all bundles you have subscribed to. After you subscribe to a bundle from Explore, it appears under Subscribed Bundles.

Unsubscribe from a Bundle 
Unsubscribe from a shared bundle when you no longer want it to appear in your Subscribed Bundles list.
Open the Subscribed Bundles tab.
Click the bundle you want to unsubscribe from.
Review the bundle description and details.
Click Unsubscribe at the bottom-left of the panel, below the changelog section.

Unsubscribe button for a subscribed bundle After unsubscribing, the bundle no longer appears under Subscribed Bundles.
Plugins 
Orca Cloud Plugins let OrcaSlicer users share, discover, subscribe to, and manage plugin listings through Orca Cloud. A plugin can be a Python script or wheel package that extends OrcaSlicer workflows, such as adding a utility script or post-processing capability.
This section focuses on the Orca Cloud web experience: creating a plugin listing, reviewing plugin details, discovering community plugins, subscribing to plugins, and managing subscribed plugins.
What are Plugins? 
Plugins are add-ons for OrcaSlicer. They can be shared through Orca Cloud so other users can discover them, review compatibility details, subscribe to them, and activate them from OrcaSlicer's Plugins window when signed in with the same Orca Cloud account.
For creators, a plugin listing gives the plugin a clear home: name, description, plugin files, screenshots or media, version, changelog, tags, supported operating systems, and compatible OrcaSlicer version.
For users, Plugin Hub provides a central place to find plugins without manually passing around loose script or wheel files.
Before You Begin 
Before using Plugins, make sure the following are ready:
Sign in to Orca Cloud: Use the same Orca Cloud account in the web portal and OrcaSlicer.
Use a current OrcaSlicer Nightly build: Plugins are available as a Beta feature in Orca Cloud and currently work only with current OrcaSlicer Nightly builds. Stable releases without the Plugins feature will not show or load Orca Cloud plugins.
Prepare your plugin file: Plugin uploads support
.pyand.whlfiles.Use a supported target OS suffix: Orca Cloud expects plugin filenames to include a supported target OS suffix, such as
my_plugin_win_x86_64.whl. Supported suffixes are:macOS:
macosx_arm64,macosx_x86_64,macosx_universal,macosxLinux:
linux,linux_arm64,linux_x86_64Windows:
win_arm64,win_x86_64,winUniversal:
any
Review compatibility before subscribing: Check the plugin type, supported OS, and compatible OrcaSlicer version before subscribing.
Plugins Overview 
The Plugins area is available from the left navigation in Orca Cloud. During the Beta period, the Plugins navigation item is marked with a Beta badge.
Open Plugins from the left navigation.
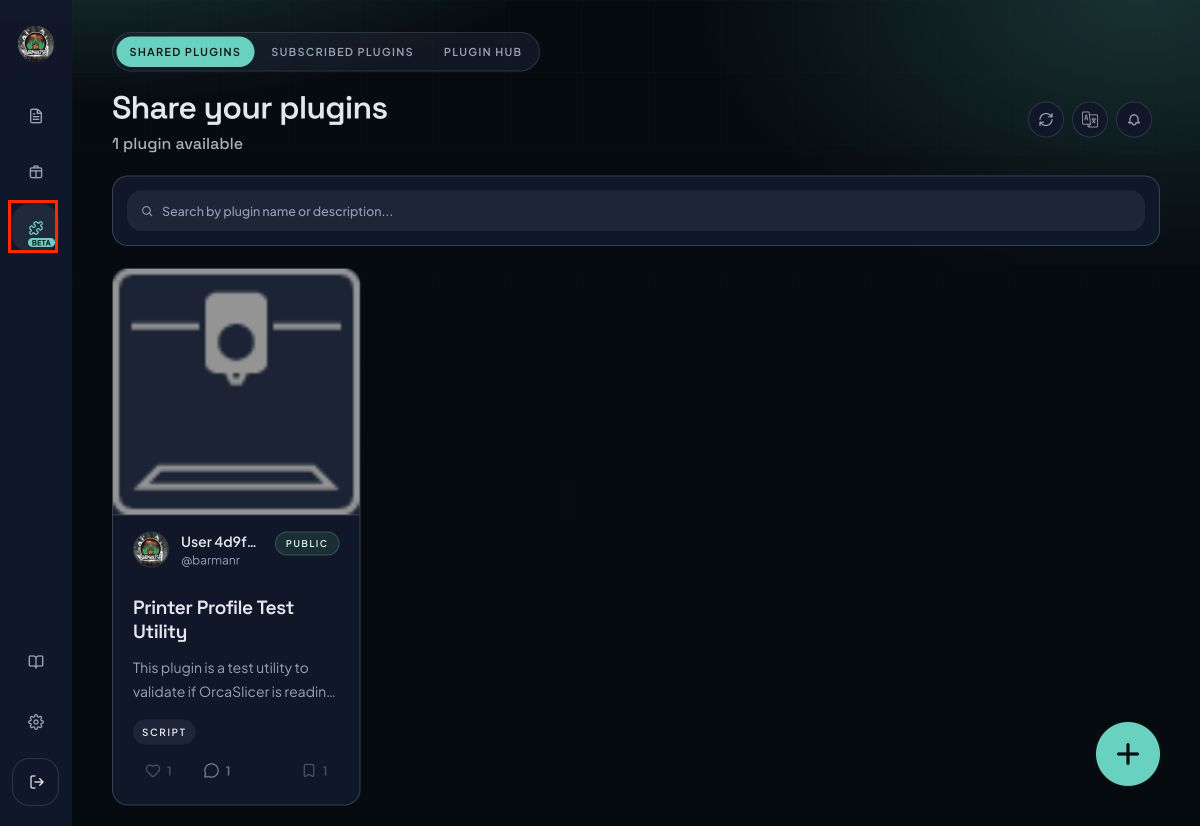
Plugins tab and main plugin tabs in Orca Cloud Use the three plugin tabs at the top of the page:
Shared Plugins: Plugins you have created or shared.
Subscribed Plugins: Plugins you have subscribed to.
Plugin Hub: Community plugins you can browse and subscribe to.
Use Search plugins to find a plugin by name or description.
Create a Plugin 
Open Plugins, then select Shared Plugins.
Click the + button in the bottom-right corner.
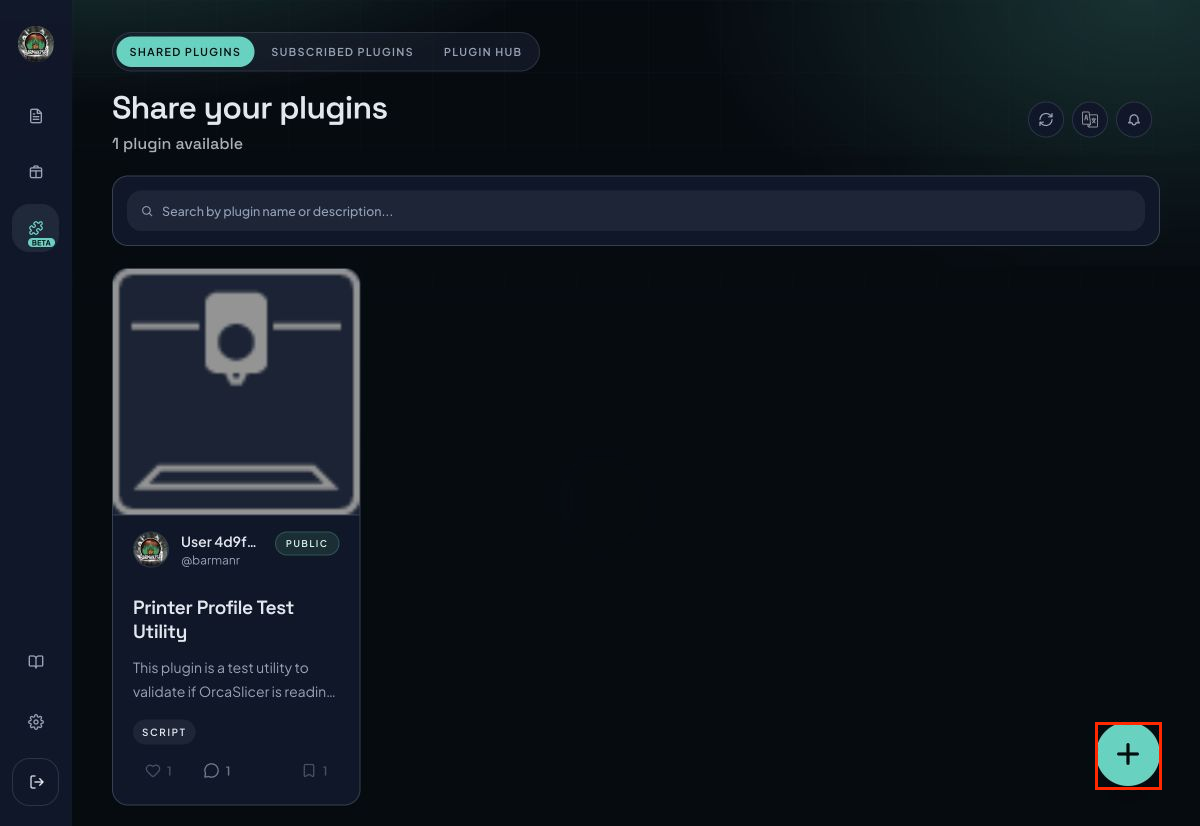
Create plugin button in Shared Plugins In the Create plugin dialog, add one or more plugin files.
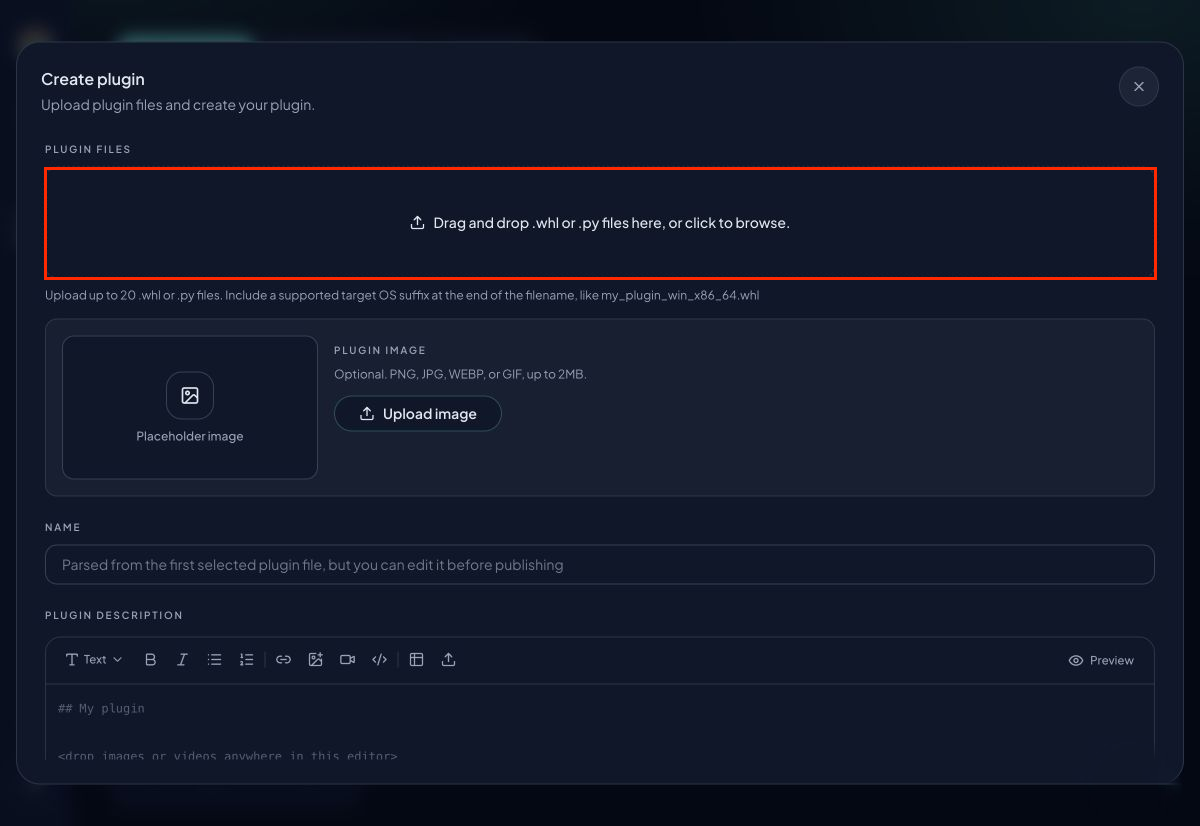
Create plugin dialog with plugin file upload, image, name, and description fields Drag and drop
.whlor.pyfiles into Plugin Files, or click the upload area to browse.Add a Plugin Image if you want the listing to have a recognizable thumbnail. Supported image formats are PNG, JPG, WEBP, or GIF, up to 2 MB.
Check the Name field. Orca Cloud can parse the name from the first selected plugin file, but you can edit it before publishing.
Write a clear Plugin Description. Use the editor toolbar to add headings, lists, links, images, video links, code blocks, or tables.
Set the plugin Version, Type, and Compatible OrcaSlicer Version.
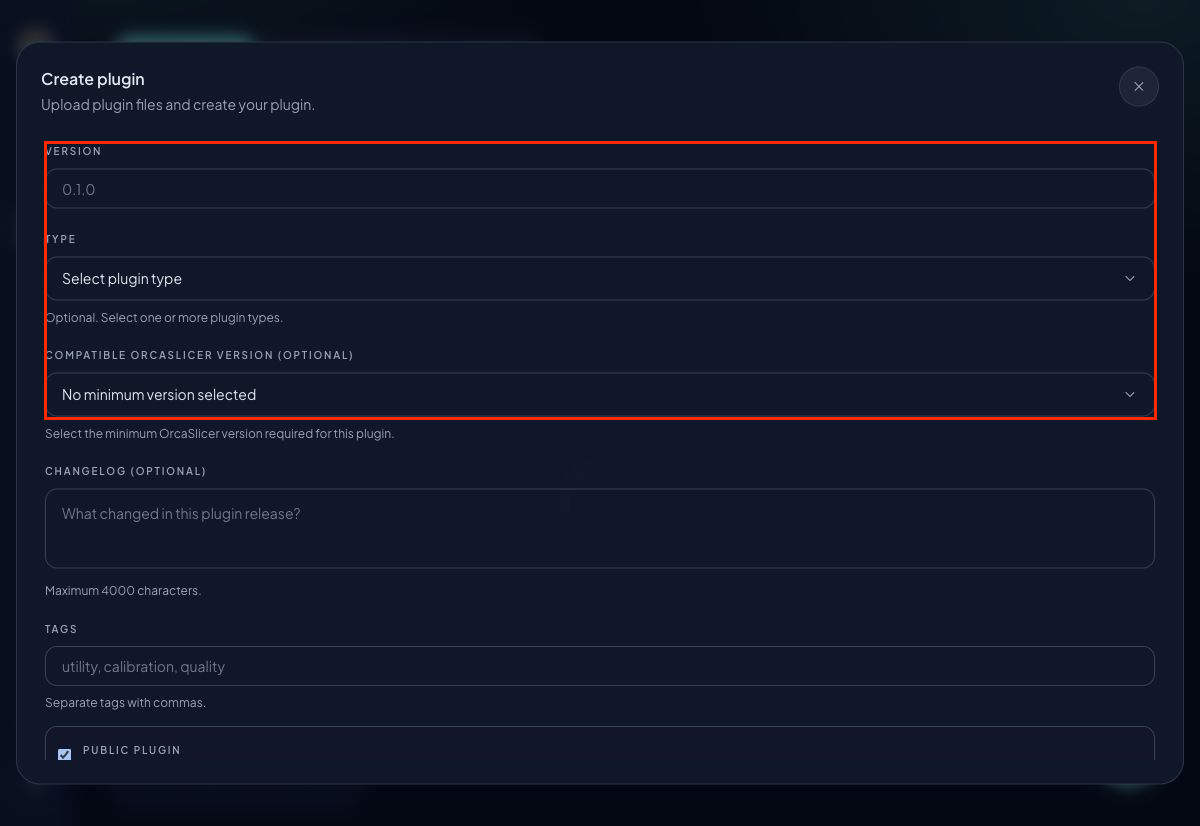
Create plugin version, type, and compatibility fields Add a Changelog so users can understand what changed in the release.
Add Tags separated by commas, such as
utility,calibration, orquality.Decide whether the plugin should be public.
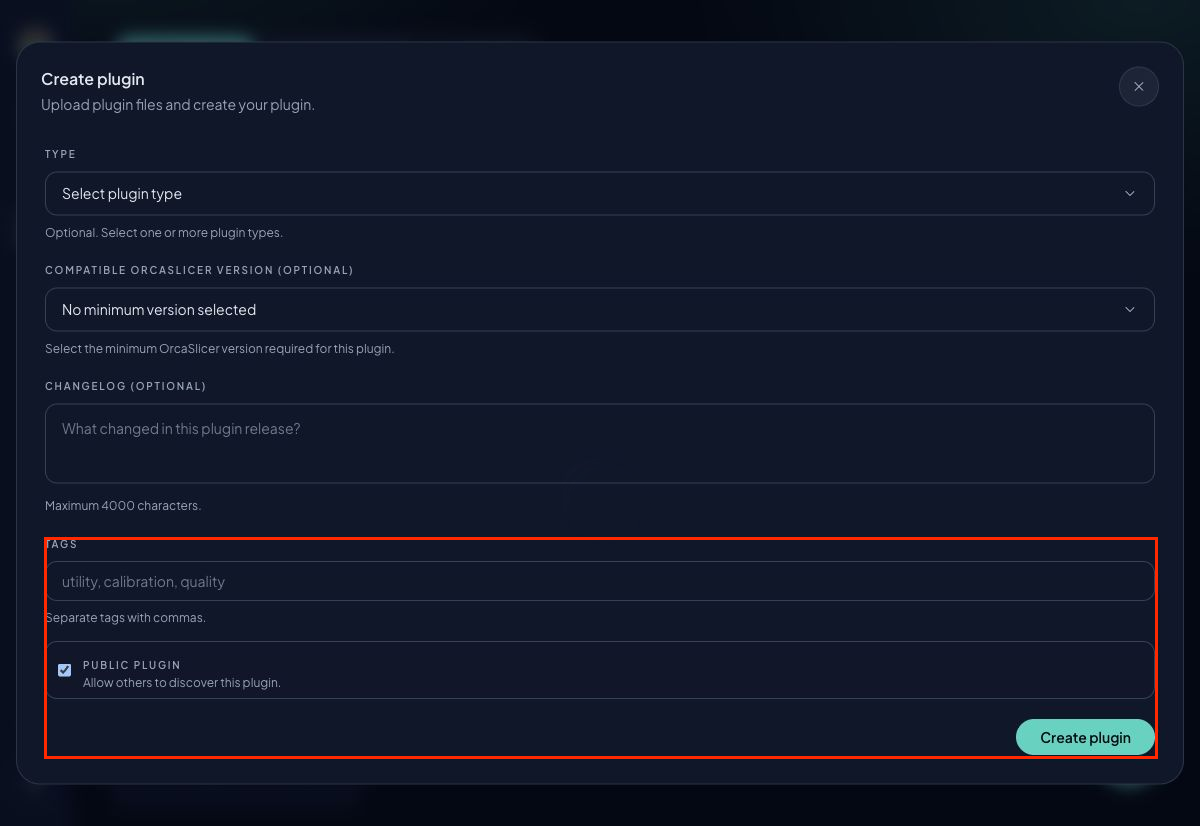
Create plugin tags, public visibility, and create button Enable Public Plugin if you want others to discover the plugin in Plugin Hub.
Click Create plugin.
Edit a Plugin 
Use Edit plugin when you need to update plugin details, replace files, add a new version, change the description, update tags, or adjust visibility.
Open Shared Plugins.
Click the plugin you want to update.
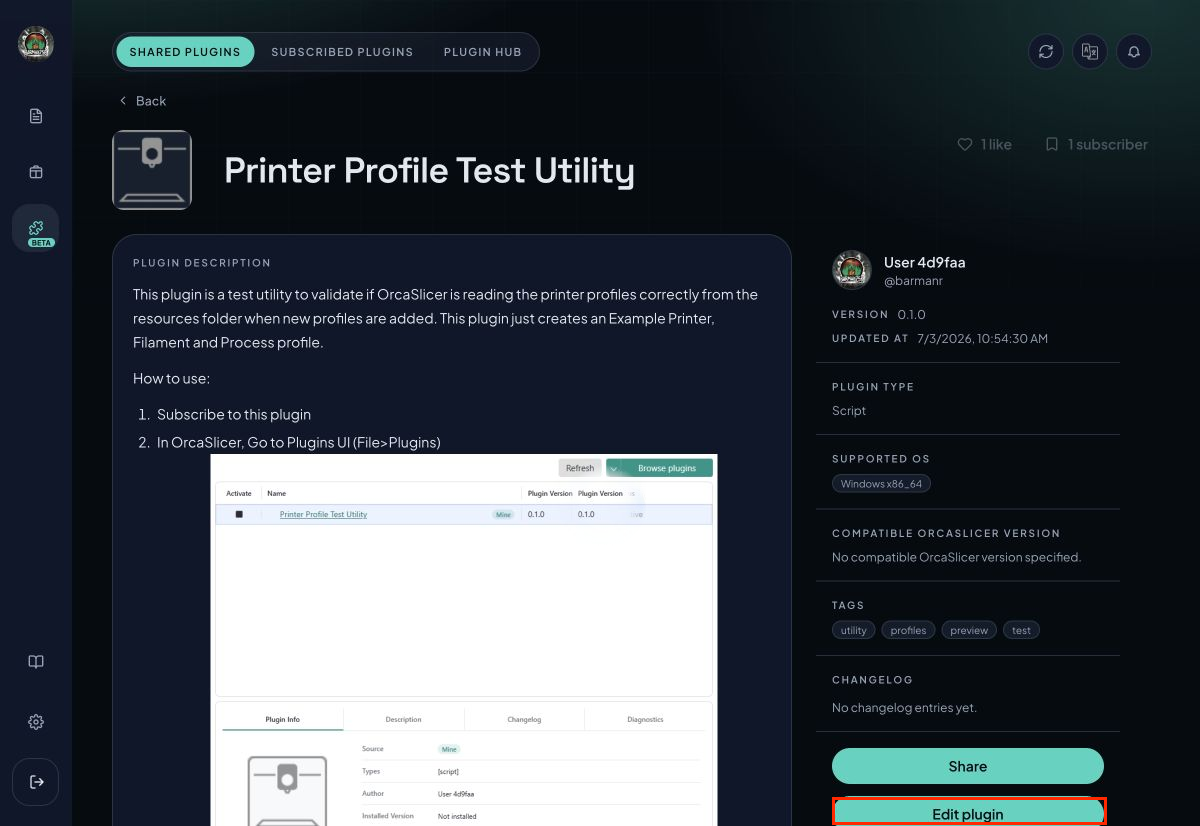
Plugin detail page with metadata and owner actions Click Edit plugin.
Review Current Plugin Files. You can keep existing files, remove files, or upload replacements.
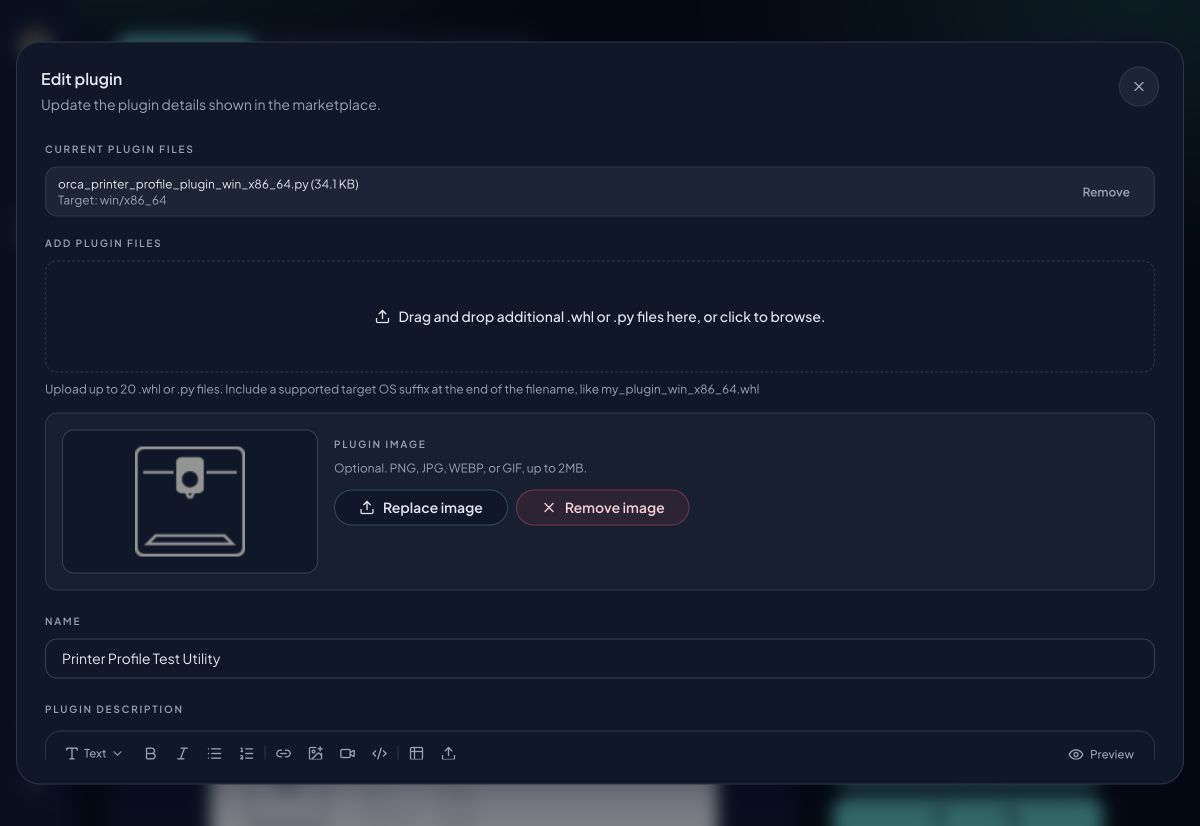
Edit plugin dialog with current files and upload controls Add additional
.whlor.pyfiles if needed. Orca Cloud allows up to 20 plugin files, with a maximum size of 100 MB per file.Update the plugin image, name, and description as needed.
Update the version, plugin type, compatible OrcaSlicer version, changelog, tags, and public visibility.
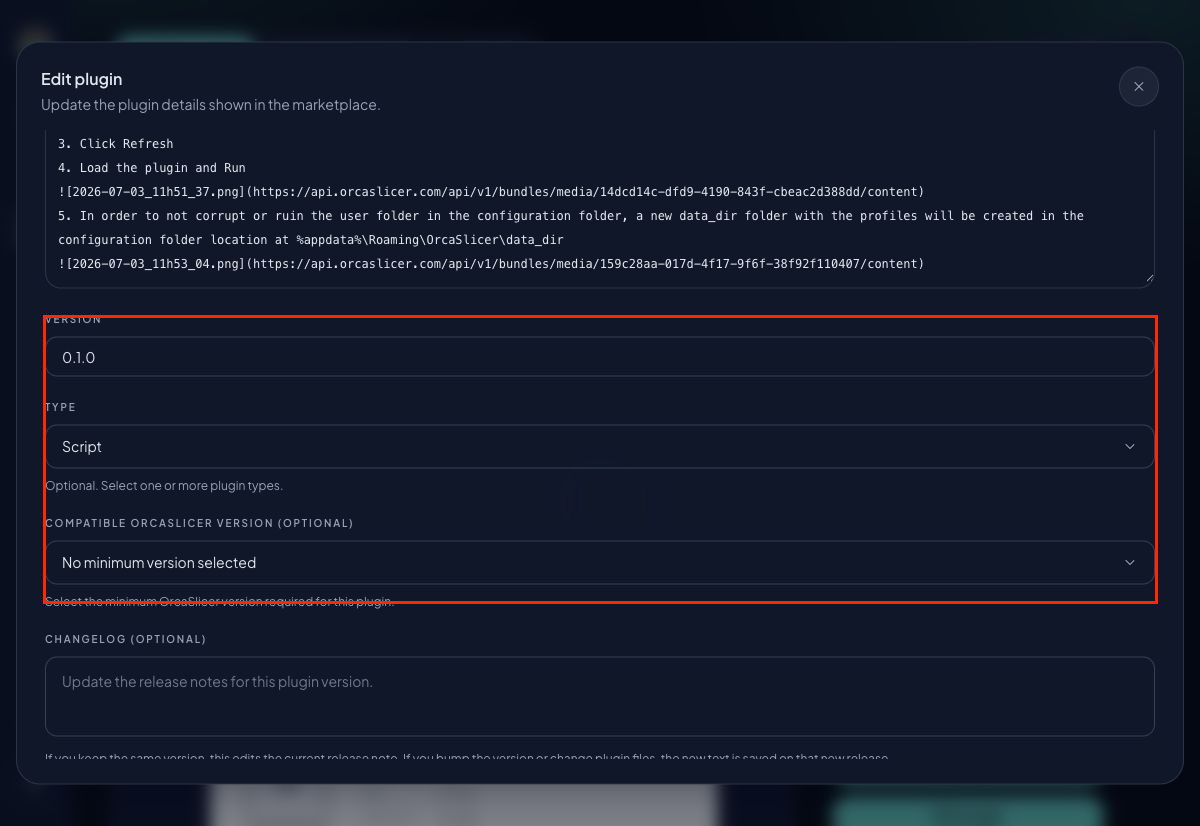
Edit plugin version, type, and compatibility fields Click Save changes.
Publish from GitHub 
Connect a GitHub repository to a plugin you own, and every GitHub release in that repository publishes a new plugin version to Orca Cloud automatically. No tokens or secrets are involved: each workflow run proves its identity with a short-lived credential signed by GitHub itself (OIDC trusted publishing).
Connect the repository first:
Open Shared Plugins and click the plugin you want to publish from GitHub.
Click Edit plugin.
In GitHub publishing, enter the repository as
owner/repositoryand click Connect.
Then add this workflow to the connected repository as .github/workflows/publish-orcacloud.yml:
name: Publish to OrcaCloud

on:
  release:
    types: [published]

permissions:
  id-token: write
  contents: read

env:
  # Space-separated globs matching the plugin files to upload (.whl / .py).
  PLUGIN_FILES: "my_plugin_any.py"

jobs:
  publish:
    runs-on: ubuntu-latest
    steps:
      - uses: actions/checkout@v4

      # Optional: build your plugin here so PLUGIN_FILES exist, e.g.
      # - run: pipx run build --wheel

      - name: Publish release to OrcaCloud
        run: |
          set -euo pipefail
          oidc_token="$(curl -sS -H "Authorization: Bearer $ACTIONS_ID_TOKEN_REQUEST_TOKEN" \
            "$ACTIONS_ID_TOKEN_REQUEST_URL&audience=orcacloud" | jq -r .value)"
          version="${GITHUB_REF_NAME#v}"
          changelog="$(jq -r '.release.body // ""' "$GITHUB_EVENT_PATH" | head -c 4000)"
          metadata="$(jq -cn --arg version "$version" --arg changelog "$changelog" \
            '{version: $version} + (if $changelog == "" then {} else {changelog: $changelog} end)')"
          args=(-F "metadata=$metadata")
          shopt -s nullglob
          for file in $PLUGIN_FILES; do
            args+=(-F "files=@$file")
          done
          if [ "${#args[@]}" -eq 1 ]; then
            echo "No plugin files matched: $PLUGIN_FILES" >&2
            exit 1
          fi
          status="$(curl -sS -o response.json -w '%{http_code}' \
            -H "Authorization: Bearer $oidc_token" \
            "${args[@]}" \
            https://api.orcaslicer.com/api/v1/plugin-publish/releases)"
          cat response.json
          echo
          [ "$status" = "201" ]
Set PLUGIN_FILES to match your plugin files. If the files are built rather than committed, add a build step before the publish step and point PLUGIN_FILES at the build output, for example dist/*.whl.
To publish a new version:
Push your changes to the repository.
Create a GitHub Release with a tag such as
v1.2.0. The tag must be a semantic version greater than the plugin's current version.Publish the release. The workflow uploads your plugin files, the tag becomes the new plugin version, and the release notes become the changelog.
The same file rules as manual uploads apply: .py and .whl files with a target OS suffix such as my_plugin_win_x86_64.whl or my_plugin_any.py, up to 20 files and 100 MB per release. If a workflow run fails, the reason from Orca Cloud is printed in the run's log on GitHub: a 401 means the repository is not connected to exactly one of your plugins, and a version error means the release tag is not higher than the plugin's current version. Re-running a successful release is safe and fails without side effects.
Share a Plugin 
Use Share to copy or send a plugin link.
Open the plugin detail page.
Click Share.
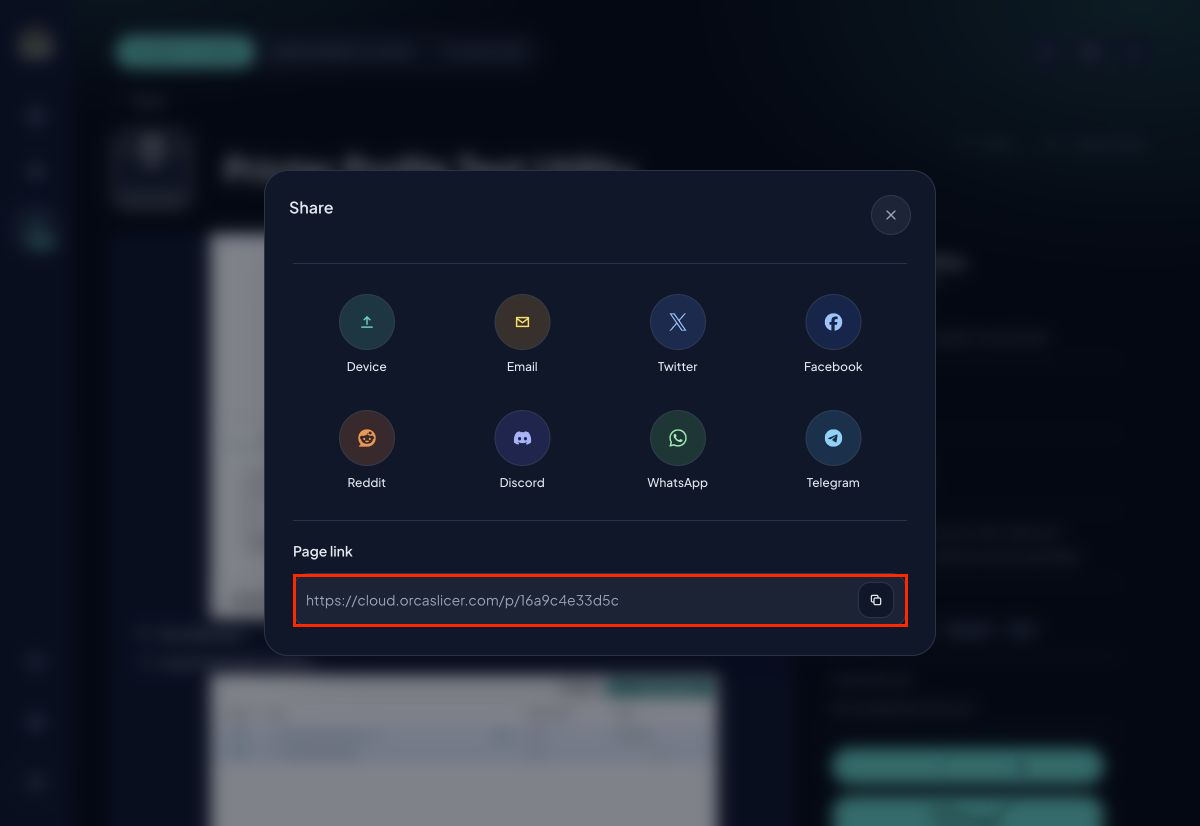
Plugin share dialog with sharing options and copy link field Choose a sharing option, or use Copy sharing link to copy the plugin URL.
Delete a Plugin 
Use Delete plugin only when you no longer want the listing to be available from your account.
Open Shared Plugins.
Click the plugin you want to remove.
Click Delete plugin.
Review the confirmation message carefully before deleting.
Plugin Hub 
Plugin Hub is where users discover community plugins.
Discover Community Plugins 
Open Plugins, then select Plugin Hub.
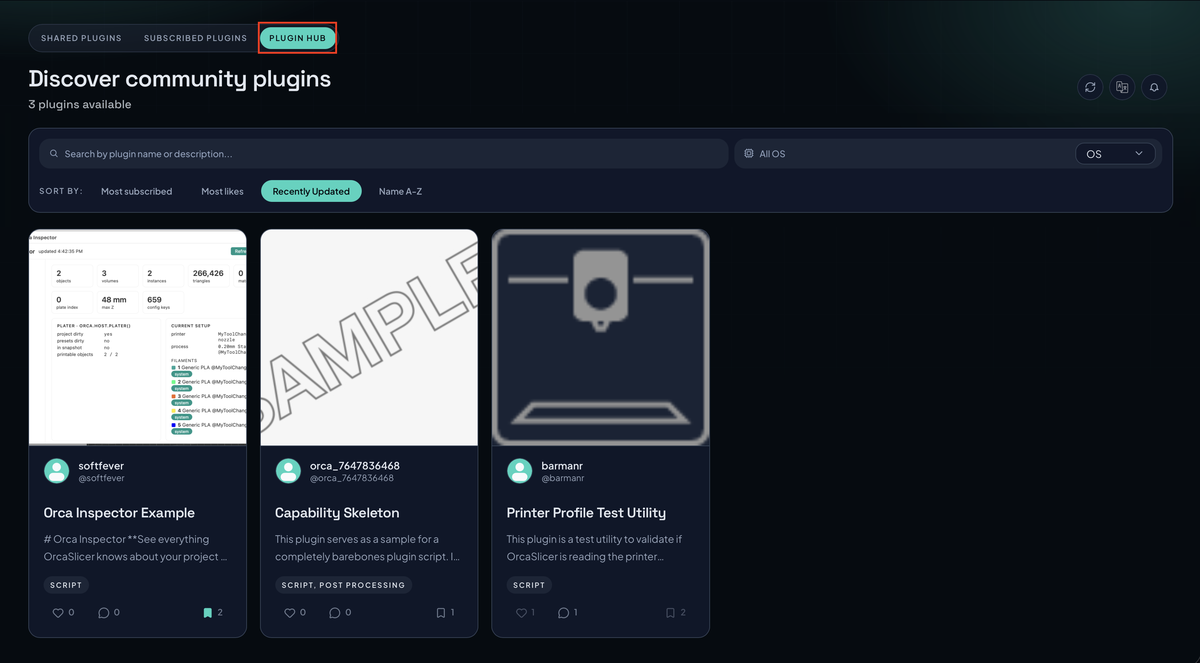
Plugin Hub search, filter, sort, and plugin cards Use Search plugins to search by plugin name or description.
Use the filter control to filter by OS or Tags.
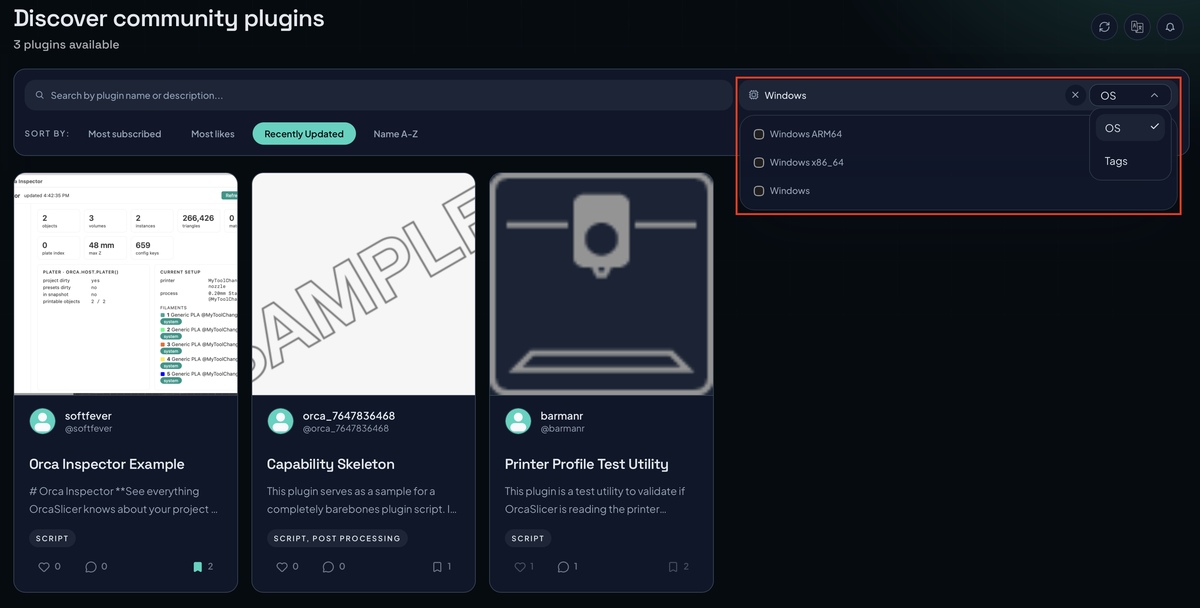
Plugin Hub filter menu with OS and Tags options Use Sort by to change the order:
Most subscribed
Most likes
Recently Updated
Name A-Z
Each plugin card shows the creator, plugin name, description, plugin type, likes, comments, and subscribers.
Review a Plugin 
Open a plugin before subscribing so you can confirm it is appropriate for your setup.
Click a plugin card in Plugin Hub.
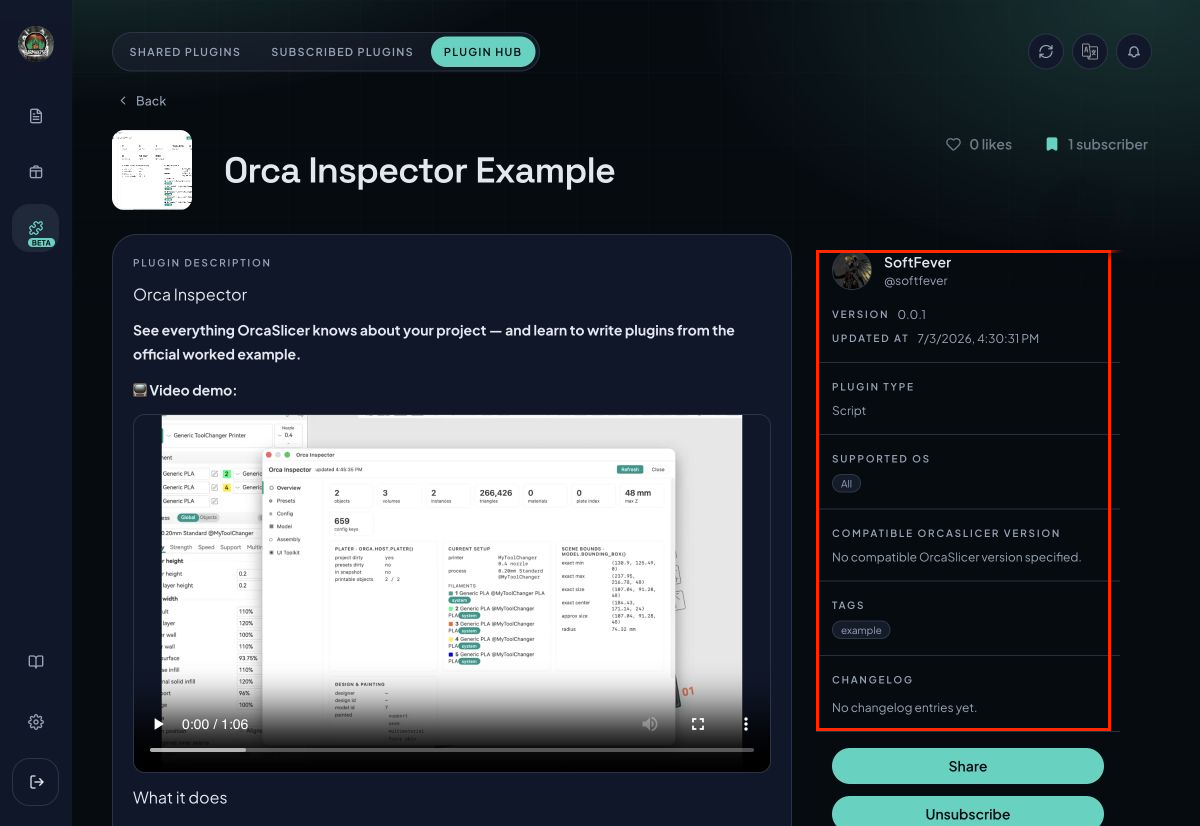
Orca Inspector Example detail page with metadata panel Review the plugin description and attached media.
Check the metadata panel:
Version: The plugin release version.
Updated at: When the listing was last updated.
Plugin Type: The type of plugin, such as Script or Post Processing.
Supported OS: The operating systems supported by the plugin.
Compatible OrcaSlicer Version: The minimum OrcaSlicer version required.
Tags: Keywords added by the creator.
Changelog: Release notes for the plugin version.
Review comments if you want additional context from the creator or other users.
Subscribe to a Plugin 
Subscribing adds the plugin to your Orca Cloud account so it can be installed and activated from OrcaSlicer's Plugins window.
Open Plugin Hub.
Search or filter until you find the plugin you want.
Open the plugin detail page.
Confirm that the supported OS and compatible OrcaSlicer version match your setup.
Click Subscribe. If the button shows Unsubscribe, the plugin is already attached to your Orca Cloud account.
Open OrcaSlicer and sign in with the same Orca Cloud account.
Open File > Plugins.
Click Refresh if the plugin list has not updated.
Check the plugin's Activate box. OrcaSlicer installs or loads the plugin as needed.
Subscribed Plugins 
Subscribed Plugins shows the plugins attached to your Orca Cloud account.
View Subscribed Plugins 
Open Plugins, then select Subscribed Plugins.
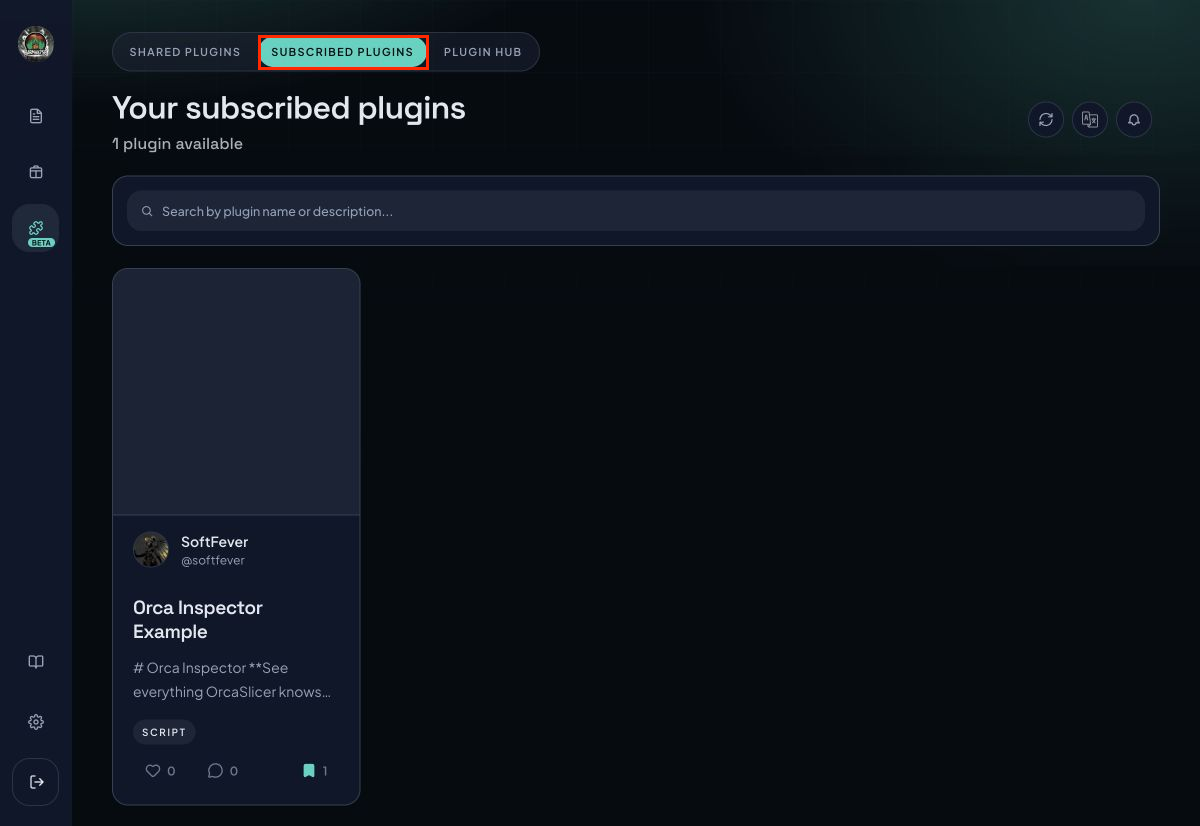
Subscribed Plugins list with search and subscribed plugin cards Click Refresh if a newly subscribed plugin does not appear immediately.
Use Search plugins to find a subscribed plugin by name or description.
Click a plugin card to open its detail page.
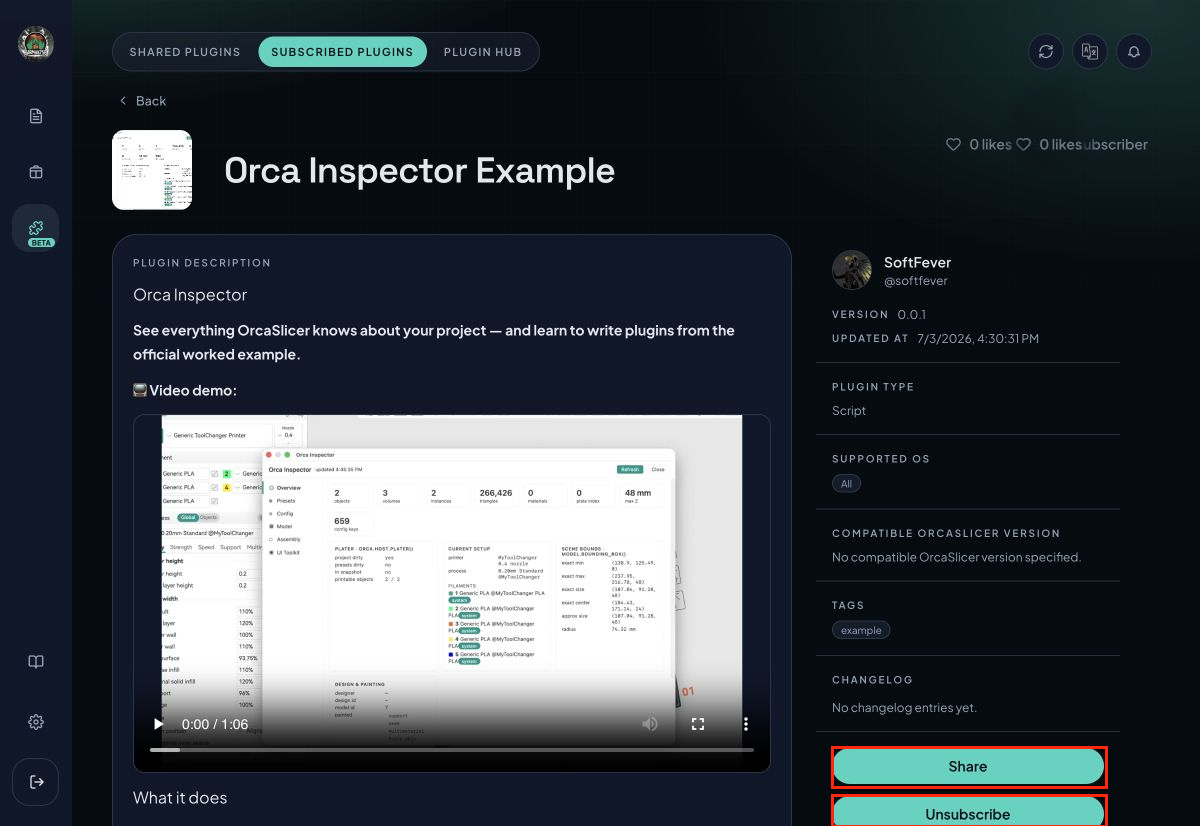
Subscribed plugin detail page with Share and Unsubscribe actions Review the plugin description, attached media, comments, version, supported OS, compatible OrcaSlicer version, tags, and changelog.
Unsubscribe from a Plugin 
Use Unsubscribe when you no longer want the plugin attached to your Orca Cloud account.
Open Subscribed Plugins.
Open the plugin you want to remove.
Click Unsubscribe.
If the plugin was already loaded in OrcaSlicer, open File > Plugins in OrcaSlicer and use Delete/Unsubscribe from the Plugins window to remove it there as well. Use Refresh if the plugin list has not updated after making changes.
Plugins FAQ 
Are Plugins required to use OrcaSlicer?
No. Plugins are optional. You can continue using OrcaSlicer without subscribing to or activating plugins.
What file types can creators upload?
The current Orca Cloud plugin upload flow accepts .py and .whl files.
Why does the filename target OS suffix matter?
The target OS suffix helps identify the platform build for the plugin file. The Create Plugin dialog gives this example: my_plugin_win_x86_64.whl.
How do I know whether a plugin supports my setup?
Open the plugin detail page and review Plugin Type, Supported OS, and Compatible OrcaSlicer Version before subscribing.
What does Public Plugin do?
When Public Plugin is enabled, the plugin can be discovered by other users in Plugin Hub. Disable it if you do not want the listing to be publicly discoverable.
Do I need a token or secret to publish from GitHub?
No. Connect the repository from Edit plugin > GitHub publishing and add the release workflow to the repository. Each workflow run authenticates with a short-lived credential signed by GitHub, so there is nothing to copy, store, or rotate. See Publish from GitHub.
Can I publish from a private repository?
Yes. The workflow runs inside your repository and uploads the plugin files directly, so Orca Cloud never needs access to the repository. Keep in mind that the uploaded files and release notes follow the plugin's visibility on Orca Cloud: publishing from a private repository to a public plugin makes those files and notes publicly visible.
How do I stop a repository from publishing my plugin?
Open Edit plugin > GitHub publishing and click Disconnect. Publishing stops immediately. You can connect a different repository at any time.
What should I do if a subscribed plugin does not appear in OrcaSlicer?
Make sure OrcaSlicer is signed in with the same Orca Cloud account, open File > Plugins, and click Refresh. If the plugin appears as subscribed but inactive, check its Activate box so OrcaSlicer can install or load it.
Creator Badges 
Creators earn a rosette badge as their shared bundles and plugins gain subscribers. The badge appears next to the creator's name on Explore and Plugin Hub cards, on bundle and plugin pages, and on the creator's public profile.
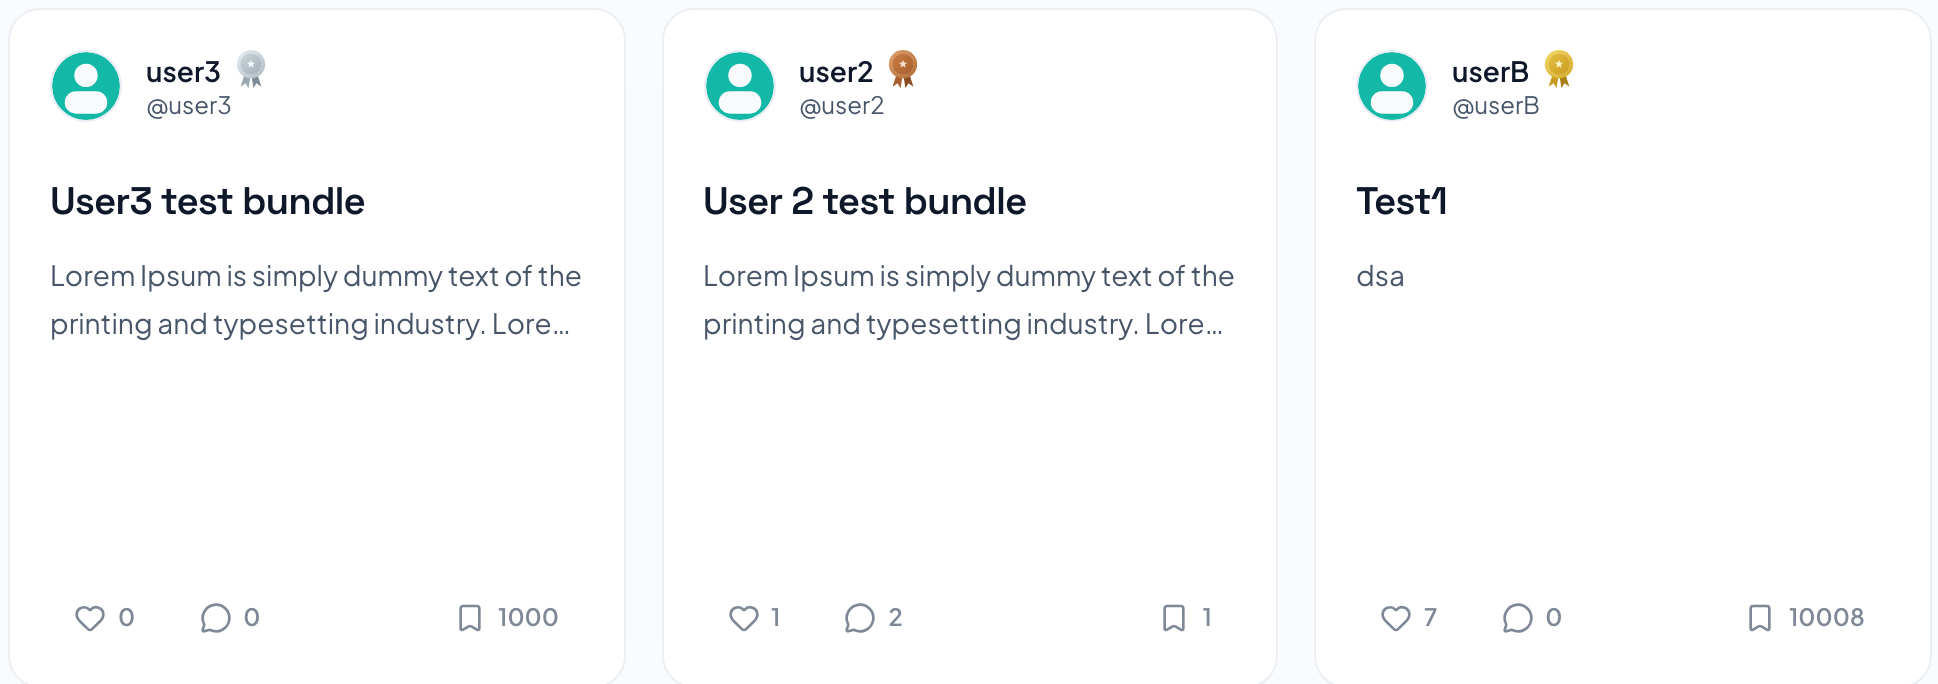
Badge Tiers 
Your badge is based on the total number of subscribes across everything you have shared — bundles and plugins combined:
Bronze — over 300 subscribes.
Silver — over 1,500 subscribes.
Gold — over 10,000 subscribes.
Orca — key contributors and users with over 100,000 subscribes.
Badges update automatically as your subscribe total grows — there is nothing to claim or configure. Hover over any badge to see its tier and the achievement behind it.

Settings 
Settings gives you one place to update your account profile, app preferences, security options, and feedback settings in Orca Cloud.
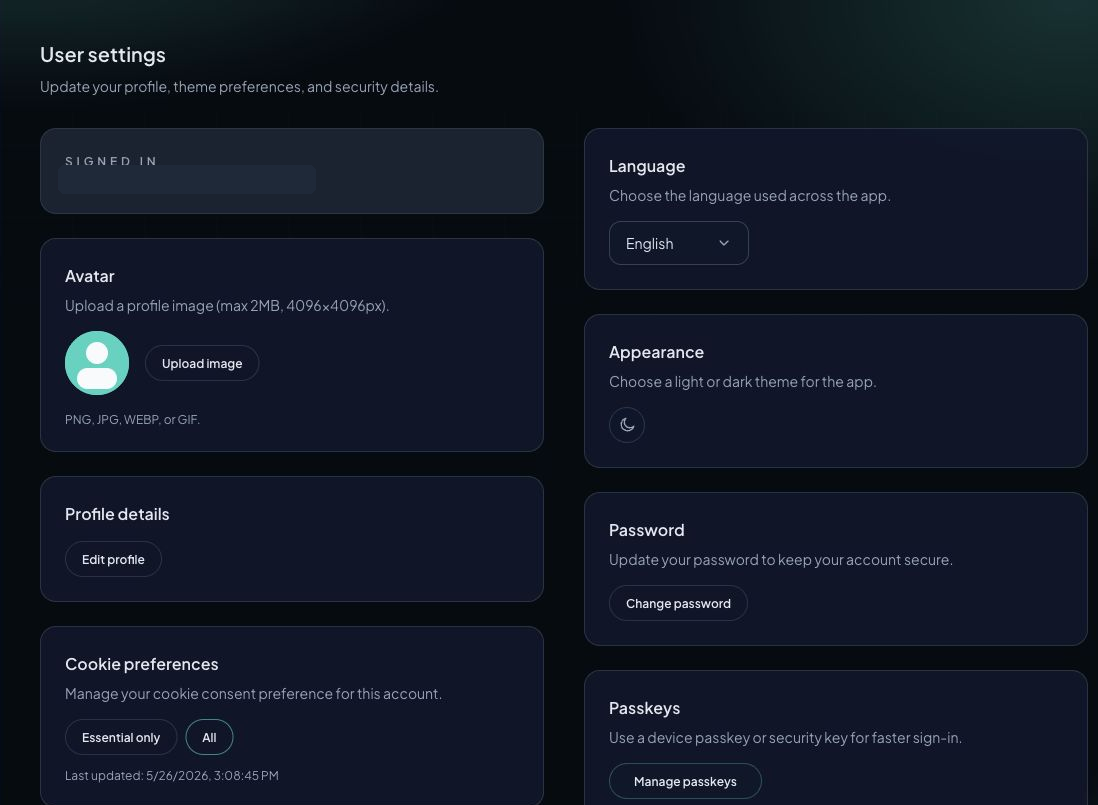
Open Settings 
Click User settings in the left navigation.
Review the account shown under Signed in to confirm you are editing the correct Orca Cloud account.
Update Your Profile 
Use Avatar and Profile details to control how your account appears in Orca Cloud.
To update your avatar, click Upload image under Avatar. Supported image formats are PNG, JPG, WEBP, or GIF. Images can be up to 2 MB and 4096 x 4096 px.
Click Edit profile under Profile details.
Update Display name, Username, Description, or optional donation links.
Click Save profile.
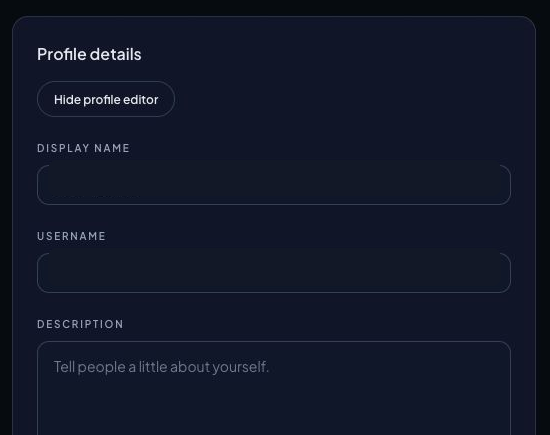
Profile editor with display name, username, description, and donation link fields
Donation Links 
Donation links are optional profile fields. Add them if you want visitors to your public Orca Cloud profile to see a Support Me area.
In Settings > Profile details, click Edit profile.
Add the full URL for any donation option you want to show, such as Ko-fi donation link, PayPal donation link, or Patreon donation link.
Click Save profile.
Open your public user profile to confirm the donation buttons appear under Support Me.

Support Me donation link shown on a public Orca Cloud user profile
Preferences 
Use preference controls to customize how Orca Cloud behaves for your account.
Cookie preferences: Choose Essential only or All to manage cookie consent.
Product feedback: Open the feedback form to share feedback, report bugs, or suggest features.
Language: Choose the app language. Available options currently include English, Simplified Chinese, and Russian.
Appearance: Toggle the app between light and dark theme.
Send Product Feedback 
In Product feedback, click Open feedback form.
Choose a feedback type: Feedback, Bug report, or Feature suggestion.
Write the details. The details field supports up to 5000 characters.
Optionally attach up to 5 images. Supported formats are PNG, JPG, WEBP, or GIF, up to 2 MB each.
Click Submit feedback.
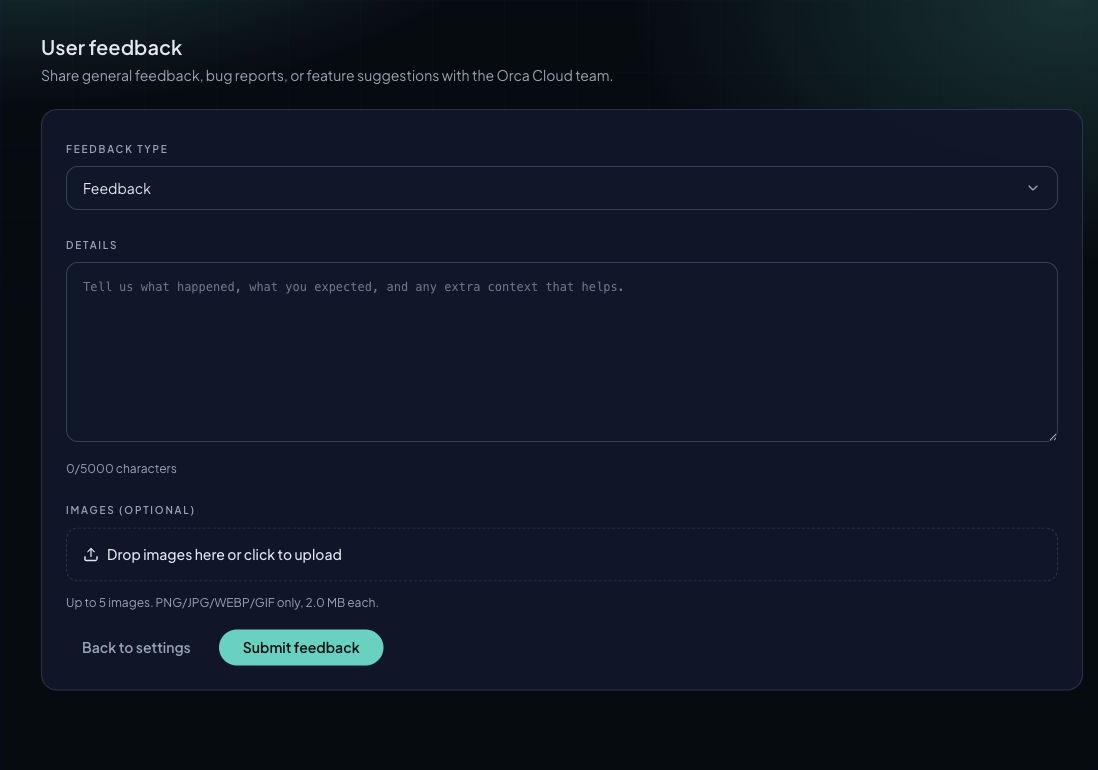
Feedback form with type, details, optional images, and submit action
Security 
Use security controls to update your password or manage passkeys.
Click Change password under Password.
Enter your current password, new password, and confirmation.
Click Update password.
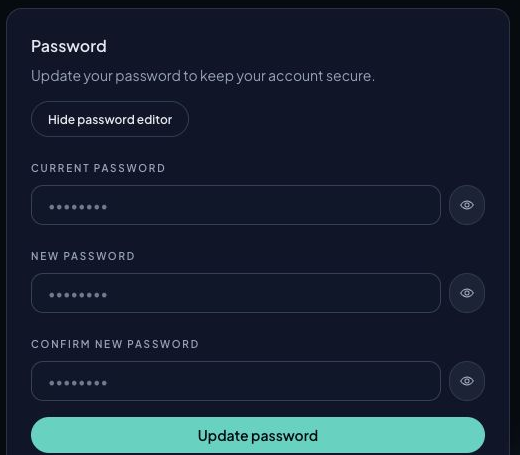
Password editor with current password, new password, and confirmation fields
To manage passkeys, click Manage passkeys under Passkeys.
Use Add passkey to create a device passkey or security key. Use Refresh passkeys if the list does not update.
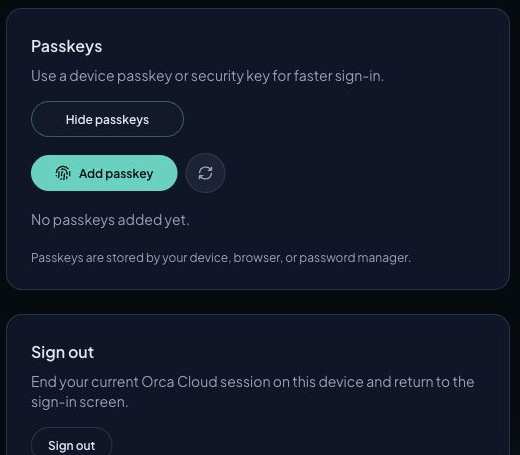
Passkey management controls in Orca Cloud settings
Sign Out 
Click Sign out to end your current Orca Cloud session on this device and return to the sign-in screen.
Delete Account 
The Delete account area is in the danger zone. Use it only if you intend to permanently delete your Orca Cloud account and related Orca Cloud records.
Orca Cloud FAQ 
This section explains why Orca Cloud was created, what it means for OrcaSlicer users, and why OrcaSlicer 2.4 uses Orca Cloud as its profile syncing service.
What is Orca Cloud?
Orca Cloud is the cloud service built for OrcaSlicer. Profile management is the first capability it delivers: syncing, backing up, restoring, versioning, and sharing printer, filament, and process profiles across computers. More capabilities will follow over time as the OrcaSlicer ecosystem grows.
What can Orca Cloud do today?
Today's focus is profile management. Depending on the OrcaSlicer version and enabled features, Orca Cloud can:
Sync printer, filament, and process profiles across devices.
Back up and restore profiles.
Manage profile versions.
Create, publish, discover, and subscribe to Shared Bundles.
Create, publish, discover, and subscribe to Plugins.
This is the starting set, not the full scope.
Do I need Orca Cloud to use OrcaSlicer?
No. Orca Cloud is optional. Local profiles, manual import/export, and offline workflows remain fully supported. OrcaSlicer is not becoming cloud-only.
Why did OrcaSlicer create its own cloud service?
We did not set out to build "yet another cloud." We built one because there are things the OrcaSlicer community has been asking for, and things we want to build next, that a purely local slicer cannot deliver.
The most immediate examples are around profiles:
Syncing between your laptop and your workshop PC.
Recovery when your drive dies or you reinstall your OS.
Sharing a tuned profile with a friend with the right context attached.
Discovering good community profiles for your printer.
But profile sync is only the starting point. Several other capabilities we want to build for OrcaSlicer also need cloud infrastructure for discovery, distribution, updates, and community collaboration. Doing those well over the long term means having a foundation designed around the OrcaSlicer community.
The 3D printing landscape is also fragmenting across printers, materials, and vendors. We believe OrcaSlicer can help connect those pieces in an open, vendor-neutral way, and that requires infrastructure built around OrcaSlicer users, not around any one vendor's product line.
What changes in OrcaSlicer 2.4?
Starting from 2.4, Orca Cloud is the profile syncing service for OrcaSlicer. If you previously used Bambu Cloud to sync OrcaSlicer profiles, you will sign in to Orca Cloud instead. Printing to your Bambu printer continues to work the same way. This change is about profile syncing only. Bambu printer support is not being dropped.
Why doesn't OrcaSlicer keep syncing profiles to Bambu Cloud like in 2.3.2?
The short answer: Bambu Cloud was never ours.
We are grateful that Bambu Lab allowed OrcaSlicer users to sync profiles through Bambu Cloud for as long as it did. But Bambu Cloud is Bambu Lab's proprietary service. As OrcaSlicer's direction became clearer, we came to see that building our long-term profile syncing on infrastructure another company owns and controls would not work. Orca Cloud is the version of profile sync we can actually commit to.
We did try to keep both working, so no one would lose their existing workflow on day one. In practice, this became very difficult. Profile syncing is not just uploading and downloading files. It involves profile structure, conflict handling, versioning, compatibility, migration, account state, error recovery, and user experience across devices. Supporting two different cloud sync systems meant more duplicated logic, more edge cases, more bugs, and more maintenance work.
Consolidating on Orca Cloud was not the outcome we originally planned for, but it is the one that lets us actually move forward.
Will Orca Cloud features become paid in the future?
Core Orca Cloud features for individual OrcaSlicer users will remain free. Profile syncing and profile sharing are part of that core today, and the same principle will apply to other core capabilities we build for individual users going forward.
We may introduce paid features over time, but only as additions for users or organizations whose needs go beyond the core individual workflow. Paid features should expand what Orca Cloud can offer, not turn core capabilities for individual users into paid-only features.
We know promises like this are easy to make and harder to keep. What gives this one weight is OrcaSlicer itself. For years, OrcaSlicer has been built and maintained by people who have put in countless hours — not for the money, but out of care for the project — and who have often spent their own money on printers, filaments, and equipment to make it better. We care deeply about this project and the reputation it has earned in the community. We are not going to trade that away for short-term revenue. It is the same spirit we carry into Orca Cloud.